Sunday, August 24, 2014
Lavender follow-up: Recipes
Hey, Mrs. Crafty,
Just in case you want to cook up a few things with your lavender bushes (before they get evicted), I've got some good recipes bookmarked. Here are my top four:
1. Fresh Lemon and Lavender Ice Cream from Emeril
2. Lavender Vanilla Sugar from Joy the Baker
PS - Joy the Baker is not married, but I feel like she'd be really, totally fine with an endorsement from a couple old married ladies. I adore her blog, and you should read it for decadent baking inspiration, cocktail recipes, or occasional cute kitty pics.
Suggested use: Roasted Pears with Blackberries, Ricotta and Lavender Sugar from Epicurious
3. Lavender Shortbread from Gale Gand
4. Lemon and Lavender Buttermilk Cake from The Cake Blog
BONUS: Not a food, but this lavender sugar scrub looks pretty good!
Hope that helps use up your lavender stash!
Love,
Mrs. Snacky
Illustration: "Lavender" by artist Elizabeth Blackwell, via the New York Public Library digital gallery here
Lavender fields in my front yard
My husband was the first one to see and actually consider buying the house we have today. He took one look at all the woodwork inside and fell in love with it. There was a lot we came to love about the house, and my personal favorite was the lavender that lines our walkway.
When we were still looking at the house, we couldn't figure out what the bushes on the walkway were. At first we thought it was rosemary, but it didn't quite smell right when we snapped off a few pieces to sniff. Finally, the structural engineer we hired to evaluate the house nonchalantly commented that there was a lot of lavender. Aha! Lavender! My husband and I had never seen lavender so big and so woody. It couldn't be a more welcoming way to arrive at our front door. We loved it.
Lavender, like most plants, needs care. With all the hubbub of moving and settling into the house, I left the rows of bushes to their own devices for the first year. I dried some of the flowers and decorated inside with them but that was really it. My mother-in-law cut the bushes back so we could actually use the walk. And then I kept having curious encounters with the neighbors about how they could "help out" with the lavender if I needed. I began to realize that there was something amiss with how the lavender was growing.
Like any good home owner, I sat down to do some research. Here are the few things that I've learned.
1. I have Provence Lavender. This is a type of lavender that will survive the winter and can last up to 20 years if maintained properly. There are 39 types of flowering lavender, according to Wikipedia, so it is important to identify the types that will flourish in your climate.
2. My lavender is misshapen and woody. This comes from not being trimmed back every season. (It is at least 5 years old, so not my fault! Whew!) You have to prune it back for it to maintain a round, bushy shape (think fields of lavender in France). I found a short and excellent video on how to do it called A Guide to Lavender: Pruning Lavender.
3. If the lavender becomes woody, it's time to remove it. Lavender will grow into whatever shape it wants. So right now, my lavender is overgrowing my walkway, making it look wild. And one of the places I am most concerned with the garden looking good is in the front of the house. So it looks like I'm going to have to replace all the lavender!
4. It is drought tolerant and best for full-sun areas with good drainage.
5. Lavender is really good for bees. So before pulling it out to be replaced, I'm going to let the bees have at it for the summer.
For now, my goal is to turn the lavender into cute, fragrant mounds. After a few years, I'd like to start harvesting it and making things like essential oils or lavender ice cream.
If you have experience with lavender, please post a comment or story. Feel free to ask questions.
And don't forget to stop and smell the lavender if you visit me!
When we were still looking at the house, we couldn't figure out what the bushes on the walkway were. At first we thought it was rosemary, but it didn't quite smell right when we snapped off a few pieces to sniff. Finally, the structural engineer we hired to evaluate the house nonchalantly commented that there was a lot of lavender. Aha! Lavender! My husband and I had never seen lavender so big and so woody. It couldn't be a more welcoming way to arrive at our front door. We loved it.
Lavender, like most plants, needs care. With all the hubbub of moving and settling into the house, I left the rows of bushes to their own devices for the first year. I dried some of the flowers and decorated inside with them but that was really it. My mother-in-law cut the bushes back so we could actually use the walk. And then I kept having curious encounters with the neighbors about how they could "help out" with the lavender if I needed. I began to realize that there was something amiss with how the lavender was growing.
Like any good home owner, I sat down to do some research. Here are the few things that I've learned.
1. I have Provence Lavender. This is a type of lavender that will survive the winter and can last up to 20 years if maintained properly. There are 39 types of flowering lavender, according to Wikipedia, so it is important to identify the types that will flourish in your climate.
2. My lavender is misshapen and woody. This comes from not being trimmed back every season. (It is at least 5 years old, so not my fault! Whew!) You have to prune it back for it to maintain a round, bushy shape (think fields of lavender in France). I found a short and excellent video on how to do it called A Guide to Lavender: Pruning Lavender.
3. If the lavender becomes woody, it's time to remove it. Lavender will grow into whatever shape it wants. So right now, my lavender is overgrowing my walkway, making it look wild. And one of the places I am most concerned with the garden looking good is in the front of the house. So it looks like I'm going to have to replace all the lavender!
4. It is drought tolerant and best for full-sun areas with good drainage.
5. Lavender is really good for bees. So before pulling it out to be replaced, I'm going to let the bees have at it for the summer.
For now, my goal is to turn the lavender into cute, fragrant mounds. After a few years, I'd like to start harvesting it and making things like essential oils or lavender ice cream.
If you have experience with lavender, please post a comment or story. Feel free to ask questions.
And don't forget to stop and smell the lavender if you visit me!
Friday, August 15, 2014
Burp-ready baby bibs
Ever since I started sewing, bibs have been high on my list of things to make. They are small, simple, and don't have to be perfect. A baby is going to spit up on them after all, so who's going to notice some wonky stitching through the stains, right?
I resisted, however, because as soon as you start making baby things, everyone expects you to be pregnant. I'm not saying I'm above suspecting that of others, but I didn't want to field any questions, so I just didn't make them. I finally broke down when I got my millionth baby announcement in the mail. It was time.
I found an awesome blog that provided a template for DIY bibs called Alice and Lois. And as with anything I craft, I skimmed the directions and just got sewing!
In true Mrs. Crafty style, the only thing I had to buy were the snaps. I'm too practical to buy expensive fabric or ultra soft lining for the back. Instead, I used my husband's old white t-shirts. They were broken in, soft, and there were a ton of them. He was tossing them at the trash can in our bedroom when I dodged in front of him to intercede and salvage the fabric. They were perfect!
I also opened up my scrap fabric drawer and had plenty to work with. If you're just getting started with sewing, then you might have to buy fabric. However, if you have done a couple of fabric projects in the past, chances are you can whip together a couple of these bibs without ever leaving the house.
The best part of using scrap fabric is that each bib tells a story. The hexagonal patterned bib is from a dress I made when my husband and I first started living together. The hexagon pattern reminded me of the board games we liked to play, so I bought it.The blue and red bib comes from fabric that I bought while I lived in Japan.
I can't wait to be reminded of all those memories as I'm feeding my future offspring! Visit the link above for directions, but again, the message here is just try it!
Front
Back
Snaps
Thursday, August 7, 2014
Supper time: Kale salad with lemon-maple dressing
Earlier in the summer, my family passed through a small town in New York where we stopped for lunch at a local restaurant. I ordered a super-healthy (and tasty) kale salad with lemon-maple dressing.
The salad was a nice break from the fast-food road trip meals I usually end up eating, and the dressing was bright and refreshing. When the owner stopped by our table to check on us, she confessed the dressing recipe was only two ingredients: fresh lemon juice and real maple syrup, in equal parts.
Since that lunch detour, I've made this dressing a handful of times, and every time I'm amazed it isn't world famous for its simplicity and adaptability. It's perfect on kale that's been lightly massaged with oil, then topped with avocado, almonds, strawberries and tomatoes (as pictured above), but it's also great on spinach salad. I think it'd pair well with shredded cabbage, grated carrots, raisins and pecans. Crumbled goat cheese would be a good addition to any of these, too.
So to reiterate:
For the dressing:
- 1 part lemon juice
- 1 part maple syrup
Directions and tips:
- Combine lemon juice and maple syrup. Shake in a small container or stir in a bowl with a whisk.
- For two servings of kale salad (with roughly 1 cup of fresh, chopped kale per person), I typically juice one lemon, see how much juice I've got, then add an equal amount of maple syrup.
- Dress your salad with as much as you like. (It's a personal preference, so I'd hate to over-dress you. Or under-dress you. Or undress you. Like I said, it's personal.) I use roughly a tablespoon for myself on a small salad.
Wednesday, August 6, 2014
Baby talk: More food for thought about breastfeeding
Before World Breastfeeding Week comes to a close, here's some additional food for thought:
- Have you ever tried to make your kids eat under a blanket? Relatedly, "Why can't you just nurse with a cover?"
- Design Mom's latest "Growing a Family" post was about breastfeeding and one mom's decision to switch to formula after two frustrating months. (I love this series, BTW.)
- Celebrity breastfeeding roundup:
- Gorgeous woman breastfeeds; all other moms be like, "STAHP. I'm wearing stained yoga pants." (But kudos on the breastfeeding!)
- Blossom, aka Mayim Bialik, is a certified lactation consultant.
- Not ironic: Alanis supports breastfeeding and is adorable.
In case you want actual, helpful information on breastfeeding, we recommend visiting La Leche League or WomensHealth.gov. A friend also suggested the book Breastfeeding Made Simple when I was pregnant, in case you want to dive into the topic in print.
Tuesday, August 5, 2014
Carefree quilting
Let me tell you about my craft philosophy.
I come from the school of Cut Thrice, Measure Never (according to my husband). I want to have a good time making stuff, and I don't want to stress out about it not being perfect.
When I started trying to quilt, sometimes it was successful and other times it was... not so much. Despite corners not meeting up and stitches going a little wonky, I still ended up with a quilt that I can use (or rather, a child can use). I imagine in time I will learn enough about it to make it look more professional, but for now I just love making.
For this quilt, Strips and Whales, I was inspired by a book that Mrs. Snacky gave me called Fresh Quilting. The philosophy in this book was something that called to me: Don't worry, just get quilting. It showed that quilts made with different sizes and shapes could be attractive.
I took some whale fabric (left over from another craft project) and cut it into strips. I did the same for some blue, green, and yellow fabric I had laying around. (Notice a theme with my fabric selection?)
I decided to make them all the same length but differing widths. Once they were all cut up, I sewed them together, then placed the batting and a large piece of fabric on the back and sewed them together. With the machine, they came out a little puckered, but I went with it and made the lines a little wonky and used the zig-zag stitch for some.
For the back: I used an old bed sheet. I never throw out fabric! I also made the batting and back fabric smaller than the front quilting. Then when I went to finish, I hemmed around it with the quilted front piece. As you can see, the back came out puckered, too, but I kind of like the way it looks.
It's not a perfect quilt, but it's certainly something I can see my future infant doing tummy time on! And who cares if she/he spits up on, drools on it, etc. It was made from scrap fabric and an old bed sheet. :)
Pinks and Yellows is my first quilt. I was inspired by simplicity of a quilt design in Martha Stewart's Encyclopedia of Sewing and Fabric Crafts. For this quilt, I went to City Quilter in NYC. If you haven't visited, please go. I bought a bundle of fat quarters because choosing the fabric was overwhelming. There was too much great stuff!
I cut the fat quarters into squares using a plastic quilting square, sewed them to batting, then hemmed the fabric all the way around. It was all pretty simple. Some of corners don't match up, especially towards the end, on the bottom right-hand corner.
For the back, I once again used an old bed sheet.
Here is a shot of the corners, not perfect but close enough.
Finally, I had to attach the front, batting and back together, so I started hand-stitching it with embroidery thread and a hoop. Needless to say, I haven't finished yet. I'm just waiting for that rainy day where all my other projects have been finished!
I encourage you to get quilting, too. Use scrap fabric, old dress shirts (which won't stretch like t-shirts), sheets, and see what you come up with. You may not end up with a perfect quilt, but you will learn a lot and hopefully enjoy doing it. :) That's the point really, to just enjoy making stuff!
Friday, August 1, 2014
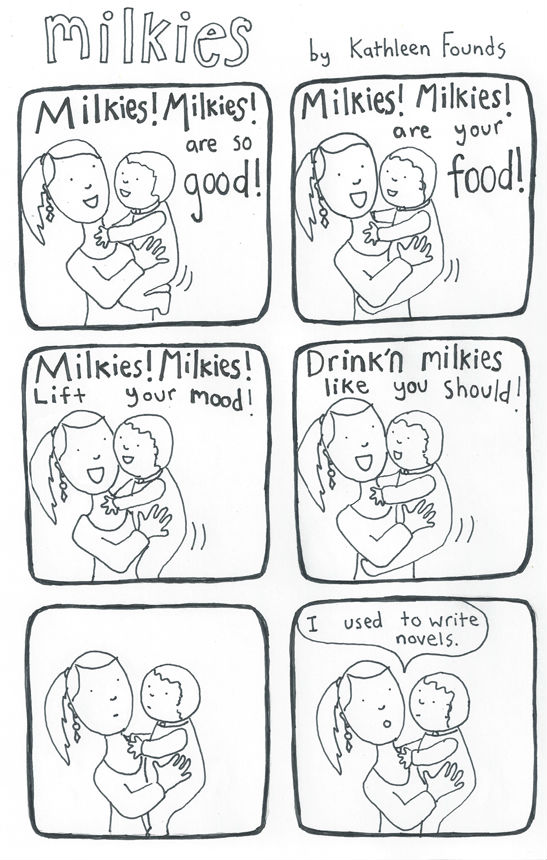
Baby talk: Hooray for breastfeeding!
Oh, hey! The first week of August is world breastfeeding week, and one of us old married ladies will participate this year. While we know that breastfeeding is a personal (and sometimes medical) decision, we think it's important to help educate everyone about the benefits of this natural human process.
Did you know...
- Breastfeeding reduces the risk of ear infections, diarrhea and stomach problems for kids.
- The metabolic energy needed to breastfeed a baby each day is the amount you’d use to walk seven miles.
- Adolescents and adults who were breastfed as babies are less likely to be overweight or obese. They are less likely to have type-2 diabetes and perform better in intelligence tests.
- Breastfeeding reduces the risk of breast cancer and ovarian cancer in moms.
- Almost three-quarters of moms produce more milk with their right breast (and it has nothing to do with being right-handed).
- U.S. breastfeeding rates were lowest in the late 1960s and early 1970s, when only 20 to 25 percent of mothers breastfed.
- In 2011, 74.6 percent of U.S. babies were breastfed (ever).
The illustration above is by Kathleen Founds, a writer and illustrator who colors giant squids and obsessively revises her novel in Marina, California. Thanks for letting us share, Kathleen!
Facts came from the Office on Women's Health, the World Health Organization and The Bump.
Subscribe to:
Posts (Atom)